The Ultimate Guide To Starting Pole Fitness At Home
There are many reasons why you might choose to start pole fitness at home. Perhaps there were no studios in your local area or the one you found didn't suit you.
Maybe classes in a studio or gym are a little on the expensive side or you're just too shy to start in front of a group.
Whatever your reason, there's still a way for you to get fit and have fun doing it, right from the comfort of your own home.
I would still advise that you try to attend at least one taster class before investing in this option, but not to worry if you can't.
If you've already tried it out or you're just looking to get in some extra practise at home then this article is for you too!
(This page contains affiliate links – my full disclosure statement is available {here})
What You Will Learn
- How to practise with limited space
- What kind of pole to look for
- Exactly which poles you should avoid like the plague
- Where to put your fitness pole
- How to learn from home
Have You Got Room To Swing A Cat?
If the answer to that is yes then you can skip past this section if you like.
However, if you are lacking in space but you still want to get some practise in at home then you'll be happy to hear that there is still plenty you can do.
While you might not be able to do a lot of spins or moves that require leg room (depending on just how small your space is), you'll still be able to build up some strength and grip at home.
You can use whatever space you do have and although it might not be ideal, it's better than nothing at all.
As they say, any pole is better than no pole, so here are 15 examples of great strength and grip building exercises that you can do even while tucked away in the corner of a room!
- Pole pull ups
- Pole Situps
- Split Levels Grip Training
- Fireman Climb
- Cross Ankle Climb
- Pole Sit
- Remi Sit
- Crucifix
- Twisted Grip Hangman
- True Grip Hangman
- Chinese Grip Hangman
- Wrist Seat
- Cupid
- Teddy
- Teddy Buddha
From beginner to advanced there's always something you can work on, I often have to adjust a move to avoid kicking my toes when I practise in the house.
All of these exercises can be performed in spaces as little as 4'5" X 4'5" - depending how leggy you are of course!
Don't forget that these are just a few fun examples, you'll find lots more things along the way that you can practise in the space you have available.
There are a couple of ways you can set up in a space this small, if you would like a bit of extra leg room you can set up your pole closer to one side of your designated space.
If you would prefer to be able to spin comfortably (but still with limited space) around your pole you'll want to keep it central to your space for that.
Depending on your own personal space and height there might be even more you can fit in and if you can invert safely there will be more still 🙂
How To Choose The Best Pole For You
If you can't try a pole fitness class to see if you like it then the only other way to try it out is to buy a pole for your home.
Your pole is going to be the biggest investment you make when you start pole fitness from home, so it's important to get it right.
When you decide to buy a pole for your home it's important that you don't buy a cheap pole and that you save up to buy the right one for you.
If you're not careful in this it could cost you more than money!
I would personally advise buying an X-Pole as they are the most reputable brand by far, although there are others with a pretty good reputation.
Lupit Pole are highly recommended and some of the others that carry a very good reputation are; Lil' Mynx, RPole and Platinum Stages.
You should absolutely NEVER buy a cheap pole.
If something is too good to be true, it probably is.
That's why you need to make sure you perform all due diligence checks on any brand poles you find that seem unusually cheap.
Cheap poles can be extremely dangerous and you should never trade your safety to save on the cost of your pole.
What To Do With Your Pole If You Find Pole Fitness Isn't For You
There's another reason getting a cheap pole just to try out pole fitness is a bad idea.
Let's take two scenarios.
The first is that you really enjoy pole fitness (as I suspect you will) and then you've wasted £40 - £80 on a cheap no brand pole that you know can be dangerous to use.
In that instance you'd have to start saving up for another new pole at the usual price and no one wants the dodgy no brand pole you bought - so you're stuck with it!
That means you're spending a lot more in the long run where a little patience and saving would have done the trick.
The second scenario is that you hate it. Imagine you've bought your cheap pole to try it out and you're just not into it. Now what?
Well, as I said earlier no one wants to buy your dodgy no brand pole from you which means you're stuck with it, and on top of that there's no way to salvage the £80 you just spent on it.
The plus side of buying an X-Pole is that as long as you have your receipts, proof of purchase and all of its parts together there will always be a buyer out there.
It's very easy to sell on an X-Pole and there's a number of places where you can sell your second hand pole, so with a genuine reason for selling it on you'll have your money back in no time.
So just to recap, if you do decide it's not for you it will be hard to sell on a cheap no brand pole.
Though initially expensive you'll be able to easily make your money back with an X-Pole if you do decide to sell it on and they don't generally decrease in value very much either!
Discover How To Avoid Ceiling Damage
When it comes to choosing your pole you're probably thinking about ceiling damage.
How can I put up a pole without damaging my ceiling, or if you are renting - how can I put up my pole without upsetting the landlord?
The good news is that there is more than one way to avoid ceiling damage with poles, so here are the different types that you might be interested in:
Permanent Poles
Not everybody's cup of tea, these are kept in place by a permanent mount that you would screw directly into a beam in the ceiling.
The biggest advantage I have found with these is that X-Pole and Lil' Mynx have ceiling mounts that are compatible with slanted or vaulted ceilings, so if you have no suitable flat ceilings this could be the answer you're looking for.
Many people worry about putting holes in the ceiling but these can be filled and painted over easily if you decide to take the pole down.
Removable Poles
The most popular choice, removable poles are pressure mounted between the floor and ceiling.
Without the need for screws it is easy to put your pole up and take it down as and when you need which can be handy if you don't want guests to see it.
The most common problem with this is the pole causing damage to the ceiling due to pressure.
It is important to understand that this type of pole WILL leave a slight mark, dent or possibly even a crack in the ceiling over time.
I constantly put mine up and take it down and depending on where I put it and how tight I secure it the effect on the ceiling is slightly different each time.
At best though, it always leaves a circular mark.
It's common for people to prevent this by putting a large block of wood or a steel plate between the pole and the ceiling to further distribute the pressure.
I've even heard of people preventing this as easily as putting a tea towel between the dome of the pole and the ceiling.
Bottom Loading Poles
X-Pole developed a very handy pole that no longer requires you to climb a ladder to put it up.
Bottom loading poles allow you to adjust the height and pressure and lock the pole into position all from the floor - handy if you don't have anyone to help you putting it up.
X-Joint Technology
X-Joints are a metal tubes that expand and contract to hold the pieces of the pole together instead of using threads and are exclusive to X-Pole.
This is not found in all X-Poles though so if you are buying second hand be sure to check as the older models do use threads.
This method of having tubes within tubes not only eliminates the risks of thread wear and joints becoming stuck but also increases pole stability.
Free Standing Poles
If you have the space for it (and a little more money to invest) the best way to completely avoid any ceiling damage at all is to buy a free standing pole.
These are available at RPole (no spinning mode mentioned), Platinum Stages (both spinning and static) and X-Pole (also both spinning and static).
By far the lightest and most portable of these is the X-Stage Lite pictured below, which means you can set it up anywhere anytime!
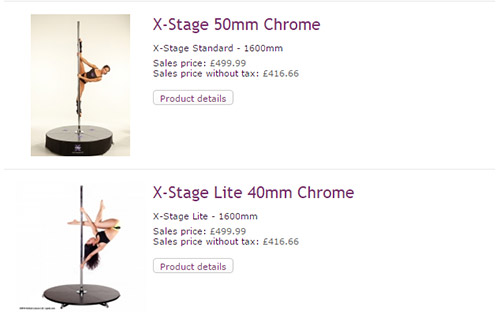
Please also note that these poles are quite tall at 10 feet so if you have a ceiling lower than that you would need to call to arrange the purchase of shorter extensions.
Warning: Avoid These Poles At All Costs!
This is quite possibly the most important thing you will read in this article so take note.
Do not under any circumstances attempt pole fitness or extreme pole dancing on "toy" poles. These are the kind you would find in places like Ann Summers.
The most popular of which is the Carmen Electra 'Professional' pole. These poles are for posing and dancing AROUND only and not safe for spins and tricks.
They are very misleading and look almost professional to the untrained eye but consist of very low quality metal and huge amounts of plastic parts.
They are simply not built to hold your weight and any attempt to swing from them or invert may result in severe injury as they will very likely come down.
There are even petitions ongoing to have it removed from sale.
Lookalikes
It's also not uncommon to hear of fake poles in the market.
I recently watched a video of another pole instructor and blogger reviewing what she believed to be an X-Pole. I could clearly see in the video it traits that told me it was definitely not an X-Pole.
These are often bought from Ebay, Amazon or GumTree if they are out there.
So to be sure you are getting what you pay for, always buy directly from the company or from a trusted seller or stockist.
You can find details about how to spot a fake X-Pole on the australian X-Pole site.
The other common problem is that there are a lot of cheaper poles for sale on the internet that look practically identical to their more expensive counterparts - again to the untrained eye.
These are simply not built to the same standard or quality and can be very dangerous.
The most common faults people find with these is chipping of metal which can cut you, or bending which can completely bring the pole down.
So remember, if it looks like an X-Pole but it has no branding - don't buy it.
If you plan to use your pole for any form of exercise, spinning or inverting avoid these poles at all costs and look out for poles that have any plastic parts as they break very easily.
Not sure if the pole brand you are looking at is trustworthy?
Feel free to ask me for advice or if you are part of a pole group you can also ask there.
Tools You Need That Won't Come With The Pole
I want to give you a heads up, because when I bought my first pole I had no idea that there were things I would need to install it that don't come in the box.
That meant I had to wait until I could get to a shop to buy them which in turn meant I had my shiny new pole at home that I couldn't even put up!
So with that in mind, here are a few things you will need:
A Stud Detector
Many poles come with instructions on locating beams in your ceiling to install your pole safely. These beams are of paramount importance and you should never install your pole in a place that has no beams.
Doing so WILL damage your ceiling for sure.
The instructions will often tell you to tap on the ceiling until you hear a dull thud as opposed to a hollow knock but I can say that in most cases it's very difficult to hear the difference.
A stud finder will make life ten times easier and guarantee that you have found your joists.
A Spirit Level
In order to safely install your pole you will need a spirit level to check that it is perfectly straight.
Please DO NOT attempt to judge this on how it looks. It may look straight but it probably isn't.
Another (frustrating) way to check this is with a plum-bob. I find this to still be quite inaccurate though so I would personally recommend a spirit level.
To aid in putting your pole up and give yourself an extra hand you might like to invest in a magnetic spirit level.

These are great because you can put them on the pole leaving both hands free for adjustments.
Tape Measure
When you find the right spot to put up your pole with the correct joists you will need to measure the space from floor to ceiling in order to choose the right extensions.
You'll also need this to measure the space in which you are going to put your pole to see if it is large enough, although this can be done by walking in a circle with your arms outstreched too.
Things Everyone Should Know About Pole Fitness At Home
As with anything there are of course pros and cons to getting started at home.
It's a longer journey to progress than those who are learning in a studio setting with an instructor for a couple of reasons.
Firstly, it won't be safe for you to launch yourself upside down before you are ready.
While a lot of classes allow you to experience this with a good spotter (someone to watch closely and catch you if you fall) this is a no go when you practise alone for obvious safety reasons.
That also means that as you get more advanced there will be certain moves that are just plain scary to try without a spotter, and others where you need a spotter to know if you can physically do it in the first place.
One way around that is to get your friend, room mate or other half to give you a hand. Or better yet, get them in on the fun too and then you can support each other!
If you are struggling with a move or you get tired it's easy to just give up. So another reason it's good to have an instructor around is for them to crack the whip and ensure you've worked your butt off.
I am a long way from any pole studios so I completely understand if you can't get to a studio at all, but that means you do sometimes have to remember to pick yourself up and try again.

It's always beneficial to get someone else's point of view on your progress too so I would definitely recommend attending drop-in classes whenever you're near by a studio if possible.
So Who Can I Learn From At Home?
If you've found yourself wondering how on earth you're going to learn pole fitness alone from scratch, don't worry! I've got you covered.
There's a huge amount of resources online that can help you.
Trial & Error
The first and most unadvisable way is trial and error. You could spend a long time trying to get to grips with just the very basics without proper instruction.
Though possible, this route is going to take you a long time and will likely be frustrating and leave you fed up and uninterested.
It's also very easy to injure yourself with pole fitness if you don't follow the correct progression process, warm ups and cooling down.
YouTube
That's why another not so advisable way to learn is through free tutorial videos you can find on YouTube. While that's great and you'll be taught proper techniques a lot of the time, some people make these moves look very easy and they're not!
Without proper progression you could really injure yourself if you attempt something you see on YouTube without a spotter.
That said, if you're a little more advanced and have mastered sliding ungracefully down from the pole when you're stuck - YouTube could be a great free resource for you!
DVD's
There are a bunch of Pole Fitness workout DVDs around that you can choose from.
These are great and most of them provide effective warm up and cool down techniques and come highly recommended.
If you're not sure which one is best to try just check out the reviews!
Online Lessons
There are more lessons emerging where you can either pay for a full pole fitness course or enroll in monthly subscriptions in exchange for access to video tutorials and lessons.
When choosing online lessons it's important to find the right teacher for you, just as you would when looking for a studio.
123-Poling is a great place to start learning pole dancing online.
Groups, Pages & Forums
As I mentioned in my very first article, the pole fitness community is a hugely supportive one with little criticism on appearance, so don't be shy.
If you have questions you need answering you can ask in pretty much any online pole group and you will find a lot of people willing to help and give advice.
Whether that's in a forum, on Reddit or in a Facebook group is entirely up to you. All I would suggest here is to be careful what advice you take and who from.
Not everyone is a professional and you should be mindful when accepting advice and always keep your safety a priority.
Events
When you don't have a physical community of pole enthusiasts pole fitness can be an entirely different experience. There really is nothing that keeps you going quite like your pole friends 🙂
That's why if you've started from scratch at home it's nice to buy yourself tickets to your nearest pole events when they happen.
Perhaps you could find a competition, showcase, convention or any other event happening near by. If you can get there, I would recommend it.
Once there it's great for bumping into lots of like minded polers.
I attended my first pole event this year and it certainly won't be the last!
Safety First!
When you practise pole fitness it's really important that you follow safe practises. Not doing so can result in severe injuries.
The most important thing you will need when you learn alone at home is a crash mat. You absolutely need something to break your fall if you happen to slip and you should ALWAYS have a crash mat beneath you.
If you are thinking 'meh that doesn't sound so important' - think again.
A very competent and experienced dancer once fell only a few inches doing a move she was well practised in that she didn't find at all difficult and broke her neck.
It only takes the smallest slip to make you fall and it's just not worth the risk. So promise you'll always use a crash mat ok?
You should also get some practise in with your grip, practise gripping with your thighs and sliding slowly to the floor, if you're doing it from an invert tuck your head up to your chest so that you don't land on your head.
It's something I regularly do if I find myself stuck, learning to ungracefully but slowly slither to the floor is preferable to falling hard out of a move.
Think about these things before you try new and complicated moves, how do I exit the move safely once I get into it?
If you have a friend or other half around as I said earlier use them to give you a hand if you're trying something new. Better yet get them to start learning too and you can learn and grow together.
It's a lot safer with two people and if there is an accident there's always someone to get help if you need it.
The most important factor to learning pole fitness from home on your own is to be safe.
Other points around safety include not wearing oils, lotions, gels, creams or moisturisers before you practise. You can read more about that and what to wear for your pole sessions in my previous post; How To Get Started With Pole Fitness.
Other Items You Might Find Handy
Lastly I just want to cover a few optional items that you might want to help you when you practise.
Yoga Mat
My yoga mat is a godsend. I didn't own one from day one of poling at home, but I honestly don't know how I lived without it!
It's great for doing warm ups before pole fitness and stretches afterwards. It's also good for bridging the gap between pole sessions to do some floor workouts on the days you don't pole.
If, like me, your pole is in a high friction burn risk area then they're great to go around the bottom of the pole too to stop that happening.
Mirror
It's a fantastic idea to have a mirror up in your pole space.
Having a mirror will help you to see how your moves are looking, remind you to keep your toes pointy and allow you to easily improve moves that might be looking a little awkward.
Without a mirror, you might not even realise where you are going wrong, especially when learning alone. Being able to see yourself makes a huge difference.
A Camera Or Camera Phone
If you can't get hold of a mirror or simply can't put one up in your pole space then the next best thing is usually your phone.
I sometimes use a GoPro if I've remembered to charge it up.
I don't enjoy using the GoPro as much as a phone, simply because you need to wait until you upload the video to watch it back, but it provides much higher quality videos.
With a phone you can record yourself, take a look and then correct any thing you didn't like and try again.
It's also great for taking stills of your awesome new moves and sharing them with your friends and other polers.
Towels
When you work out it's likely that you're going to get pretty sweaty.
The problem with pole fitness is that the pole then becomes nice and slippery - the perfect combo to make you slip and fall.
That's why it's always a good idea to have a couple of small towels to hand, even a tea towel would do.
One for you and one to wipe the pole when it feels slippy is usually enough, although I also keep a damp one to give it a clean mid practise too.
Grip Aid
If you find yourself suffering with sweaty palms, or slippery anything really, it's very handy to have some grip aid lying around.
You can use anything from grip aid used by golfers and bowling teams like mighty grip, to simple climbers chalk. Or if that's not enough you can buy mighty grip gloves to give you maximum grip of the pole.
Be mindful though that some grips make spinning on a static pole almost impossible once you have them on.
I've only ever used chalk and while it works for me you might want to try out other options to compare the difference and see what works best for you!
A Quick Recap
By now you should have everything you need to know to get set up at home and get started on your pole journey.
That was quite a lot to take in and as I write this I've passed the 4,000 word mark! So let's have a quick summary of the critical points to take away from this article.
Key Take-Aways
- Choose a pole from a well known brand with a great reputation
- For safety NEVER Choose a cheap pole or toy pole for example; Carmen Electra Hot Pink Peekaboo dance poles or other unbranded models
- Be on the lookout for fake poles - always buy direct from the company or a trusted seller
- In the event that you buy a second hand pole always double check the authenticity
- Invest in a stud detector and a spirit level for pole installation
- Find the learning platform that suits you best
- Always follow safe practise on the pole
- Find an online group or forum for support, advice & motivation!
For a more detailed look at what to look for in a pole, how to avoid ceiling damage and how to spot dangerous fake poles, please see my guide to buying a pole for your home.
If there's anything you don't understand or you have any questions at all just leave me a comment below! 🙂
